Guide

Blurry app store screenshots: why they happen and the fix

Two side-by-side iPhone screenshot panels of the same UI, the left rendered blurry with soft mushy text, the right pixel-sharp with crisp edges

Diagnose exactly why your store screenshots look soft and walk away with an export workflow that produces pixel-sharp PNGs at every required device size — without a subscription, without uploading unreleased UI to a third-party server.

Published June 12, 2026 · 9 min read

See ListingShots →

TLDR

Why do exported app store screenshots look blurry and how do I keep @2x and @3x crisp? Most blur comes from upscaling a smaller capture, exporting at the wrong multiplier, or lossy JPG compression on UI text. Render at the largest native size ( 1290 by 2796 for iPhone), export as PNG, and never enlarge after capture.

Why do exported app store screenshots look blurry and how do I keep @2x and @3x crisp?

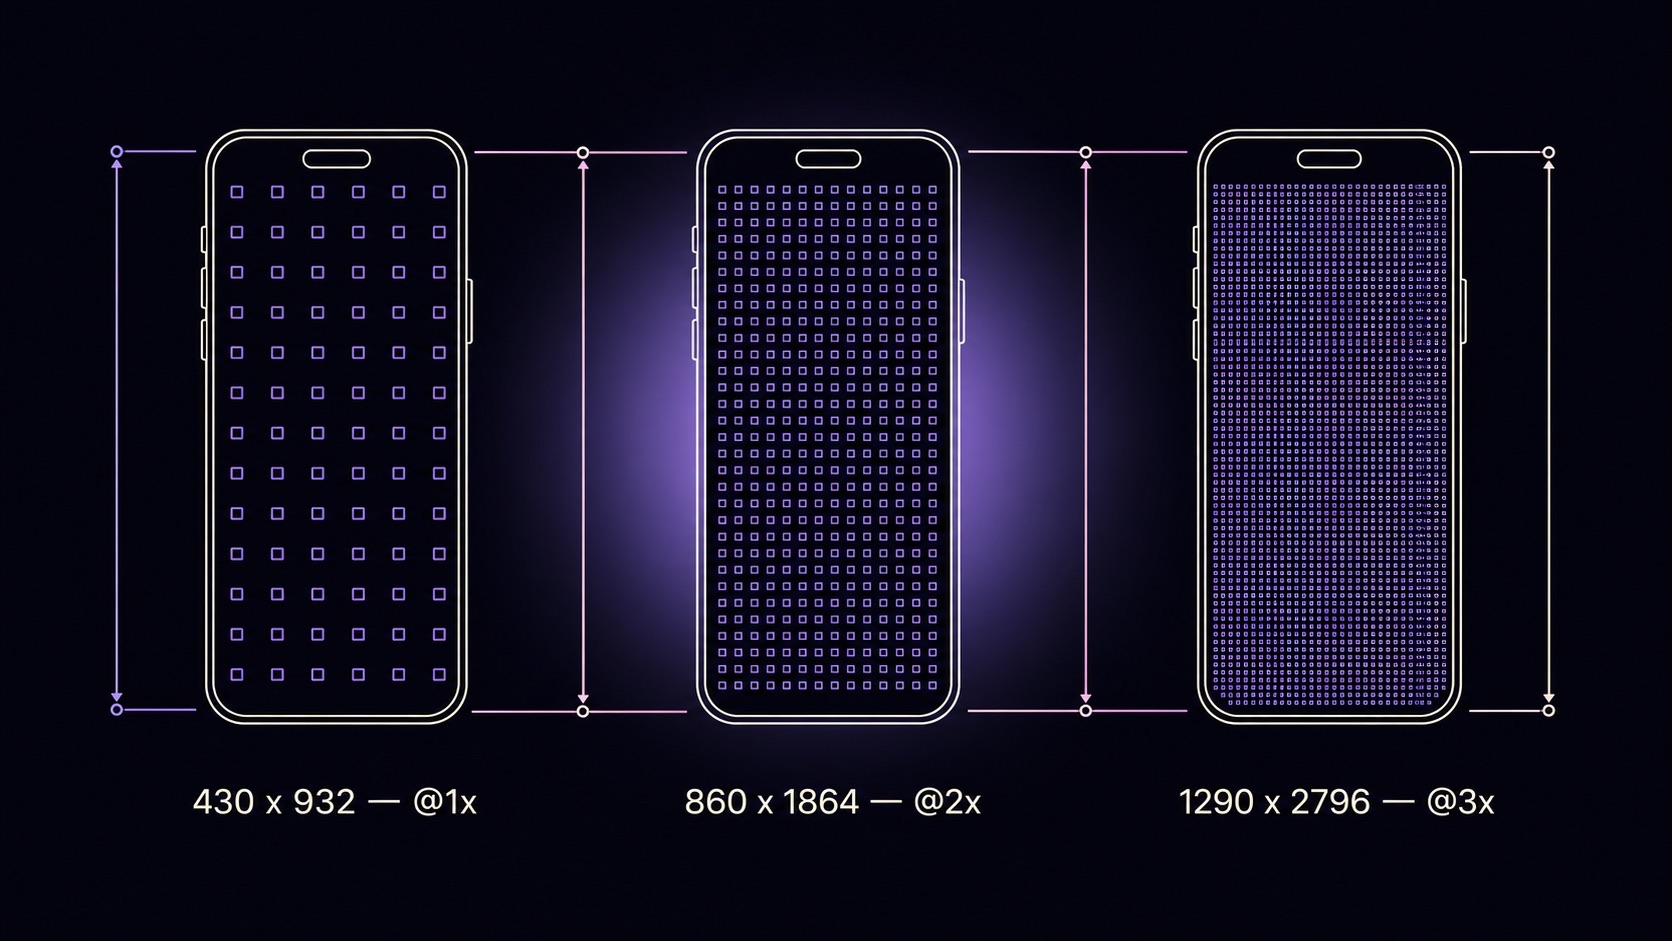
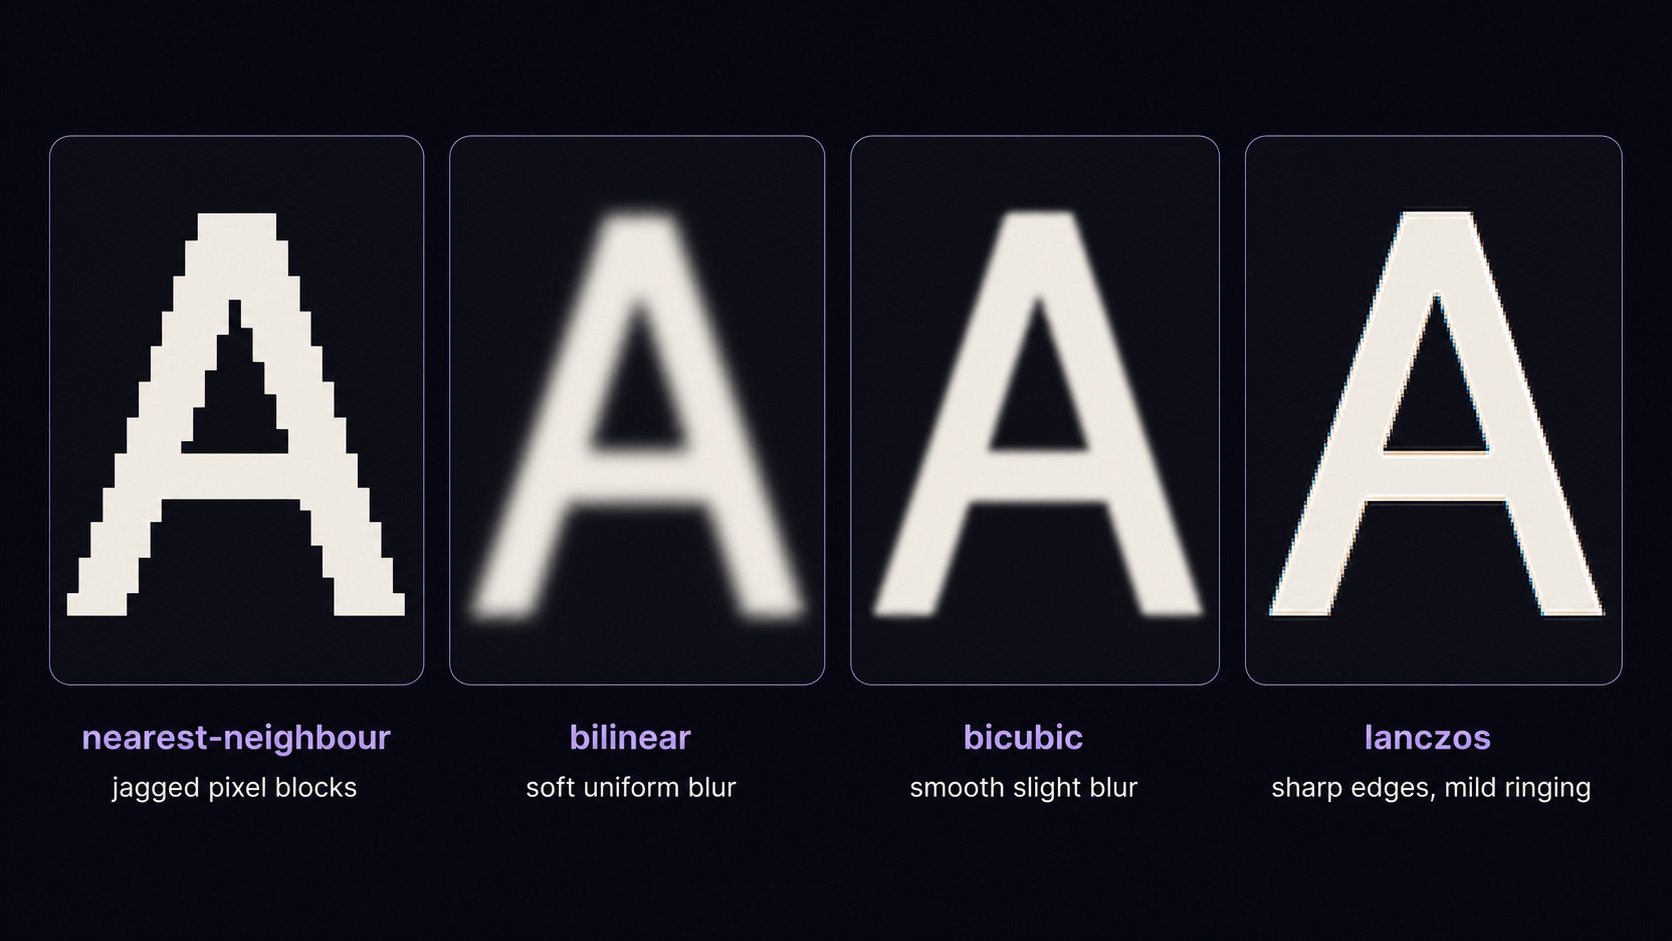
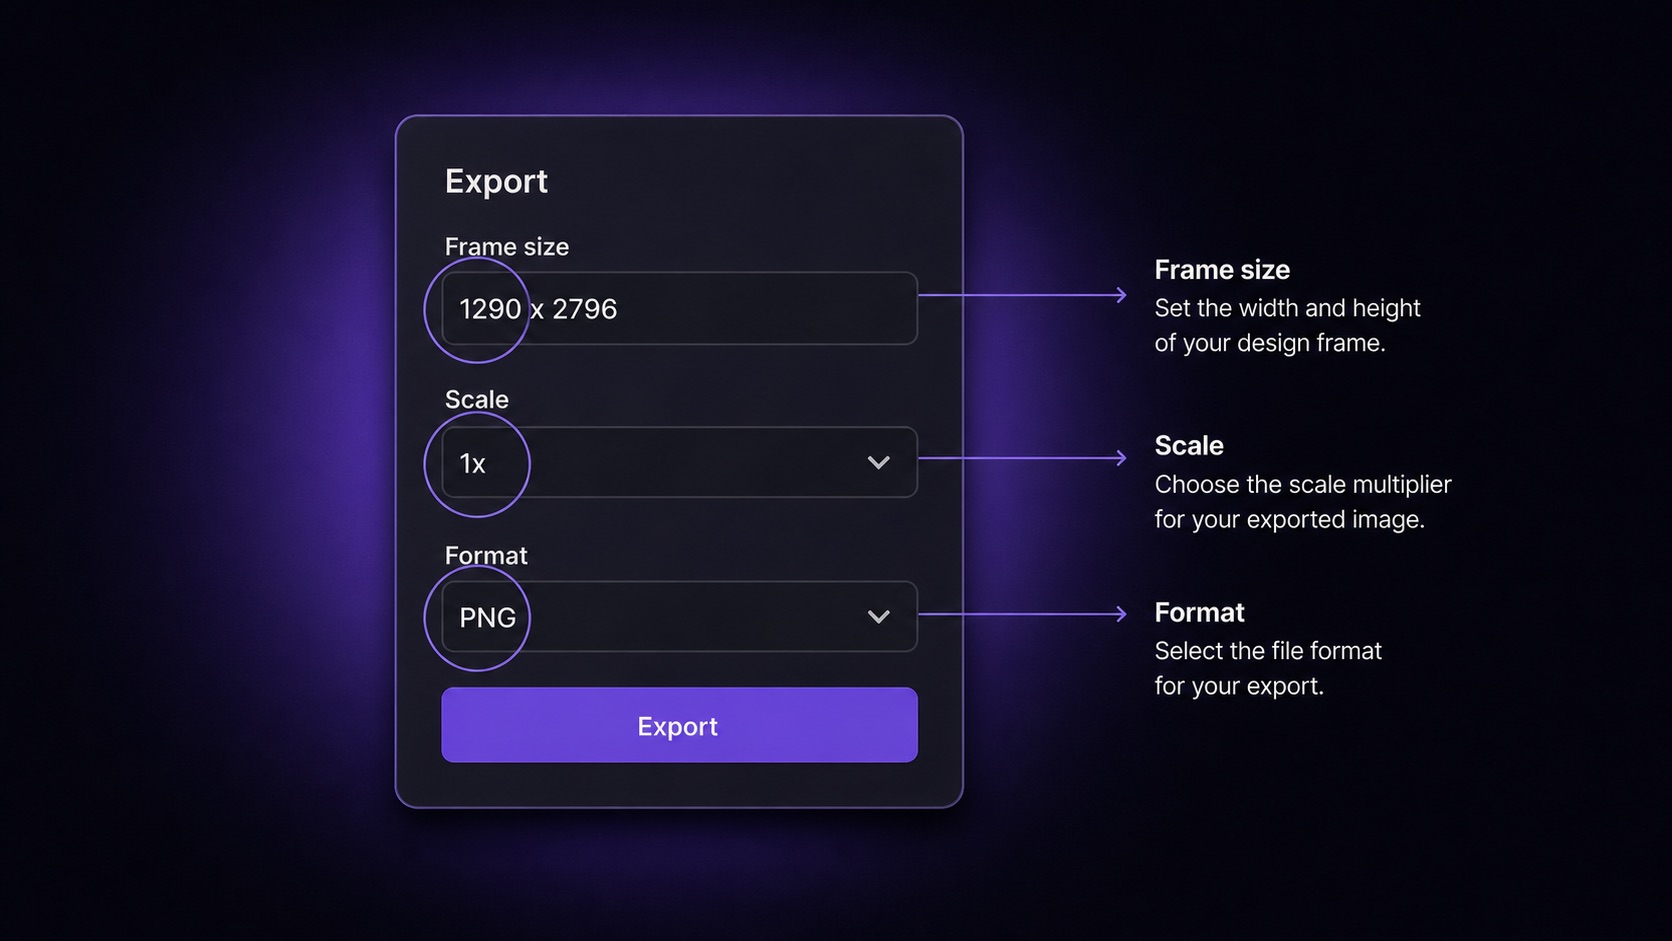
Answer: Most blur comes from one of four root causes: upscaling a smaller capture, exporting at @1x when the store expects @3x, lossy JPG compression on UI text, or a viewer or color-profile mismatch. Render the largest native size (1290 by 2796 for iPhone), export as PNG, and never enlarge after capture.

The blur almost never comes from the store. It comes from the moment you exported. A screenshot that looks crisp on your design canvas can lose half its pixels by the time it lands on the storefront if any of three things go wrong: the source capture was too small, the export multiplier did not match the device class, or a lossy format softened the UI text on its way out. Fix the export and the store listing follows.

The rest of this guide walks through each of those four root causes in order, explains the pixel math behind @1x, @2x, and @3x so you can pick the right one for every device class, and ends with format and color-profile rules so the file survives the upload pipeline intact.

The resolution math behind app store screenshots

Answer: Every accepted store size is a fixed pixel grid, not a DPI value. iPhone 6.9-inch is 1290 by 2796. iPhone 6.5-inch is 1242 by 2688 or 1284 by 2778. iPad 13-inch is 2064 by 2752. Hit these numbers exactly at capture time and the file stays sharp through upload.

@2x vs @3x app store screenshots. Apple's design tooling thinks in points. A 430 by 932 point iPhone canvas at @3x renders to 1290 by 2796 pixels — the exact 6.9-inch store size. At @2x it renders to 860 by 1864, which is too small for the 6.9-inch shelf and gets upscaled on the listing. At @1x it renders to 430 by 932, which Apple rejects. The multiplier is not a quality knob; it is the pixel-density rule the store enforces.

Native pixel counts for every accepted device. iPhone 6.9-inch is 1290 by 2796. iPhone 6.5-inch is either 1242 by 2688 or 1284 by 2778 depending on the device class submitted. iPad 13-inch is 2064 by 2752. iPad 12.9-inch is 2048 by 2732. Google Play phone screenshots accept any pixel size between 320 and 3840 per side with a max 2 to 1 aspect ratio. Microsoft Store accepts 1366 by 768, 1920 by 1080, 2160 by 2160, or 3840 by 2160. Hit one of these grids at capture time and you are done.

Three side-by-side iPhone canvases at @1x, @2x, and @3x with progressively denser pixel grids inside, each labeled with the resulting export pixel count of 430x932, 860x1864, and 1290x2796

How upscaling and resampling algorithms destroy sharpness

Answer: Enlarging a raster image forces the software to invent pixels it never had. Nearest-neighbour produces jagged blocks. Bilinear and bicubic blur edges to hide the guesswork. Lanczos preserves edges but rings near hard contrast. Shrinking is safe, growing is not. Capture at the largest target dimension and downscale once.

Bilinear, bicubic, and Lanczos compared. Nearest-neighbour copies the closest pixel and produces visibly jagged blocks at any scale above 1.5x. Bilinear averages four neighbours and softens edges to hide the guess. Bicubic samples 16 neighbours and looks smoother but still adds a faint blur. Lanczos uses a windowed sinc filter that preserves edge contrast better, with the tradeoff of mild ringing near very high contrast transitions. For UI text and thin lines, Lanczos is the safest pick; for photographic backgrounds, bicubic.

Why downscaling preserves text and upscaling cannot. Shrinking averages information you already have. Even a naive bilinear downscale keeps text legible because every output pixel sees more than one input pixel. Enlarging is the opposite: you ask the algorithm to fabricate detail that was never captured, and every algorithm has to guess. The practical rule is one direction only: capture at or above the largest target dimension and let your tool downscale to the smaller device classes in a single pass.

Four-panel macro comparison of the same letter A enlarged 4x using nearest-neighbour, bilinear, bicubic, and Lanczos resampling, each panel labeled with the algorithm name

Figma, Sketch, and Photoshop export settings that keep pixels sharp

Answer: In Figma, set the frame to the exact native pixel size and export at 1x as PNG. In Sketch, untick Trim and export as PNG with the slice fixed to native dimensions. In Photoshop, snap vectors to the pixel grid, choose Export As PNG-24, and confirm the canvas matches the target store size before saving.

Figma. Set the frame to the exact native pixel size — for example 1290 by 2796 for the iPhone 6.9-inch shelf — and export at 1x as PNG. Avoid the temptation to keep a smaller design frame and export at 2x or 3x; that path works in theory but routinely produces files that are a single pixel off the spec and get rejected on upload. Turn on Pixel Preview to spot softness on the canvas before exporting.

Sketch. In the Export panel, untick Trim, fix the slice to the native dimension, set Format to PNG, and Size to 1x. Sketch snaps to the pixel grid by default, so the only common failure mode is exporting a sub-frame instead of the full canvas.

Photoshop. Enable Snap Vectors To Pixel Grid under Preferences → General. Use File → Export → Export As, pick PNG-24, and confirm the canvas matches the target store size before saving. PNG-24 is the right choice for UI work; PNG-8 quantizes colors and softens gradients, and "Save for Web (Legacy)" defaults to 72 PPI metadata which can occasionally trip App Store Connect validation.

Annotated illustration of a Figma-style export panel with frame size set to 1290x2796, scale set to 1x, and format set to PNG, with highlight rings around the three critical fields

Fix blurry iOS screenshot upload before you press submit

Answer: Open the file in Preview at 100 percent zoom and check text edges. If the PNG looks soft there, re-export from the source at native size. If it looks sharp locally but blurry on the storefront, the issue is store-side downscaling from a wrong base submission. Always submit the 6.9-inch iPhone size as the master.

Walk through these checks in order before submitting. Stopping at the first one that fails saves a rejection cycle.

1

Open the PNG in Preview (macOS) or any image viewer at exactly 100 percent zoom. Inspect a body-text region. If it looks soft here, the export is the problem and the storefront cannot rescue it.

2

Confirm the file is the exact spec dimension. 1290 by 2796 fails a 1284 by 2778 slot. Re-export from the source rather than resizing the existing PNG.

3

Verify the file is PNG, not JPG. JPG visibly softens text and gradients even at quality 100 because of chroma subsampling.

4

Confirm the color profile is sRGB IEC61966-2.1. Display P3 or CMYK files render fine locally but desaturate on upload.

5

Submit the largest required size as the master. For iPhone, that means 1290 by 2796 (6.9-inch). Apple downscales the master into smaller shelves; it does not upscale to larger ones.

6

After upload, check the listing preview in App Store Connect at the device-frame level. If the storefront preview is soft but your local file is sharp, you are looking at store-side downscaling, not a file problem.

App store screenshot resolution requirements by device and store

Answer: Apple accepts JPEG, JPG, and PNG, one to ten per device class, with strict per-device pixel sizes. Google Play accepts JPEG or 24-bit PNG without alpha, 320 to 3840 pixels per side, with a 2 to 1 max aspect ratio. Microsoft Store accepts PNG and JPG at 1366 by 768, 1920 by 1080, or 3840 by 2160.

The full per-device pixel table lives in the App Store screenshot sizes 2026 reference. The table below summarizes the cross-store format and dimension rules so you can plan the export before opening Apple's docs.

Store

Accepted formats

Pixel dimensions

Notes

App Store (iPhone 6.9-inch)

PNG, JPG, JPEG

1290 x 2796

Required base submission. Apple downscales this to the 6.5-inch shelf.

App Store (iPhone 6.5-inch)

PNG, JPG, JPEG

1242 x 2688 or 1284 x 2778

Submit explicitly if the 6.9-inch downscale renders poorly.

App Store (iPad 13-inch)

PNG, JPG, JPEG

2064 x 2752

Required base submission for iPad. Auto-scales to 12.9 and 11-inch.

Google Play (phone)

JPEG, 24-bit PNG (no alpha)

320 to 3840 px per side, max 2:1 ratio

Higher source resolution gives the store more downscale headroom.

Google Play (feature graphic)

JPEG, 24-bit PNG (no alpha)

1024 x 500

Single graphic, not a screenshot carousel. Text-safe area applies.

Microsoft Store (Windows)

PNG, JPG

1366 x 768, 1920 x 1080, 2160 x 2160, 3840 x 2160

Pick the largest resolution your UI is designed for.

Windows-friendly screenshot workflows without Mac-only tools

Answer: Windows developers do not need Xcode or macOS. Capture from a connected device via Android Studio Emulator or scrcpy at native resolution, then process exports in a local tool that knows store dimensions. Avoid web uploaders that recompress your PNGs and avoid pre-launch upload of unreleased UI to third-party servers.

Why Mac-only workflows fail Windows devs. The standard recommendation — Xcode Simulator, Cmd+S — assumes you have a Mac under your desk. Cross-platform indies who build on Windows are left choosing between renting a Mac in the cloud, uploading raw UI to a browser-based generator, or wrestling with image editors that do not know Apple's current spec. None of those produce pixel-sharp output reliably.

The local capture path. For Android, connect a device and use Android Studio Emulator or scrcpy at native resolution to capture flat PNGs. For iOS-only apps from Windows, TestFlight on a borrowed device plus a cloud iOS simulator that supports image export is the lowest-friction route. In both cases, the raw capture never leaves your machine.

The local processing path. A native desktop app that ships current store presets exports each frame at the exact integer dimension Apple requires, flattens to 8-bit sRGB PNG with no alpha channel, and applies the correct file format — every export is upload-ready by default. No subscription, and the unreleased UI never crosses a third-party server. If App Store Connect still rejects a sharp file, the App Store Connect screenshot rejected guide walks through the metadata and format causes.

FAQ

Frequently asked questions

Sharp on the first export

One-time $15.99. No subscription. A native desktop app for Mac and Windows that exports every store-ready screenshot at the exact integer dimension Apple requires — flat sRGB PNG, no alpha channel, no upscale.

Buy ListingShots — $15.99Download the installer

macOS 12+ · Windows 10+ · One-time purchase

App Store screenshot sizes 2026 →App Store Connect screenshot rejected →